
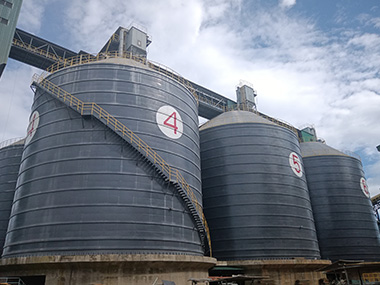

Bolted Steel Silo Panel Fabrication: What Actually Determines Shell Integrity
Bolted steel silo panels are factory-formed, pre-drilled curved steel sheets that assemble on-site into a complete silo shell — no field welding required. The fabrication quality of these panels determines whether your silo holds 10,000 tonnes of cement for 25 years or starts leaking at the seams within 18 months. Here's what separates panels that work from panels that don't.
Panel Geometry and Dimensional Tolerances
Roll-Forming Curvature Accuracy
Every panel starts as a flat coil — typically 2.5 mm to 4.0 mm thick, 1,000 mm to 1,250 mm wide. The roll-forming machine bends that strip into a precise arc. The radius has to be dead-on. I've seen panels come off the line with a radius 8 mm off-spec, and the crew on-site tried to force them into position with a come-along. That panel never seated properly against its neighbor. You could fit a 10 mm feeler gauge into the joint.
The tolerance we hold at Manxing is ±2 mm on panel radius across the full arc length. That's tighter than what most fabricators offer, but it's the difference between a shell that stacks clean and one where every third panel needs persuading. The roll-forming line runs at 8 to 12 meters per minute depending on thickness. Thicker material — say 4.0 mm for a high-capacity cement silo — slows the line down and increases springback, so the overbend compensation has to be dialed in per batch.
Bolt Hole Pattern Precision
This is where most fabrication shops cut corners, and it's the detail that causes the most field headaches. A typical panel for a 20-meter-diameter silo has 40 to 60 bolt holes per edge — vertical seams and horizontal seams combined. If those holes are off by even 3 mm, the next panel won't line up. Stack that error across 15 panels in a ring, and you've got a 45 mm mismatch at the closure joint.
We use CNC punching after roll-forming, not drilling. Punching holds ±0.5 mm positional accuracy. Drilling on a template? You're looking at ±1.5 to 2.0 mm, minimum. The hole diameter is typically 1 mm larger than the bolt — so an M16 bolt gets a 17 mm hole. That 1 mm clearance is your assembly tolerance budget. Eat it up with sloppy hole placement and you're done.
Edge Preparation and Overlap Geometry
Bolted silo panels overlap at the joints — usually a double-lap or single-lap configuration depending on the design pressure. For a cement silo operating at 10 to 15 kPa internal pressure, we specify a 40 mm minimum overlap. The edge of each panel gets a clean shear cut, no burrs. A burr on the overlap edge creates a gap that the gasket can't seal against. I've watched a crew spend an hour with an angle grinder cleaning burrs off panels that should have left the factory ready to bolt. That's fabrication quality showing up as site labor cost.
Material Selection and Coating Systems
Steel Grade Selection
The baseline for most industrial silo panels is Q235B per GB/T 700 or equivalent S235JR per EN 10025. Yield strength of 235 MPa minimum. For high-capacity silos — say 5,000 tonnes and above — we step up to Q355B (S355JR) for the lower rings where hoop stress peaks. The bottom ring of a 10,000-tonne cement silo sees hoop stresses approaching 180 MPa under full load. Q235B gives you margin, but Q355B gives you comfort.
Material thickness is a function of diameter, capacity, and stored material density. A 15-meter-diameter silo storing cement (bulk density ~1.2 to 1.5 t/m³) typically runs 3.0 mm panels in the upper rings and 4.0 mm in the lower two rings. Storing slag (1.8 to 2.2 t/m³)? You're looking at 4.0 mm minimum throughout, and the lower rings might go to 5.0 mm. These aren't guesses — they come out of the structural calculations per EN 1993-4-1 (silos and tanks).
Hot-Dip Galvanizing: The Only Coating That Makes Sense
I'm not a fan of painted panels for bolted silos. Paint chips during transport, scratches during assembly, and once you've got a bare steel edge at a bolted joint, corrosion starts. Hot-dip galvanizing per GB/T 13912 or ISO 1461 gives you 55 to 85 µm of zinc coating depending on thickness. That coating sacrifices itself to protect the steel. A scratch through galvanizing still protects the surrounding area cathodically. A scratch through paint is a rust initiation point.
The galvanizing bath runs at 445 to 460°C. Thin panels — 2.5 mm — can distort in the bath if they're not braced properly. We fixture every panel before it goes in. I visited a fabrication shop in Jiangsu where they were galvanizing 3.0 mm panels without fixturing. The panels came out of the bath with a 15 mm bow across the width. They shipped them anyway. Those panels were rejected on-site in Vietnam — the crew couldn't get the bolt holes to line up. 200 panels, scrapped. The galvanizing cost alone was ¥180,000 wasted.
Coating Thickness and Service Life
At 70 µm average coating thickness on 3.0 mm steel, you're looking at 25 to 30 years of service life in a C3 environment (moderate industrial atmosphere) before the first maintenance touch-up. In a C5 environment — coastal cement terminal, salt-laden air — that drops to 15 to 18 years. We've specified 100 µm minimum for projects in Southeast Asia and the Gulf Coast. It costs about 12% more on the galvanizing line, but it buys you a decade of service life. The math works.
Bolted Connection Design and Torque Control
Bolt Grade and Preload Requirements
Standard silo bolts are grade 8.8 — tensile strength 800 MPa, yield 640 MPa. M16 is the workhorse size for most panel connections. For high-pressure silos or seismic zones, we go to M20 grade 10.9. The preload on an M16 grade 8.8 bolt should hit 60 to 70 kN. That's what keeps the joint clamped tight enough to prevent gasket extrusion and moisture ingress.
Here's the thing — bolt preload is not about torque. It's about tension. Torque is just the proxy we use in the field. The relationship between torque and tension depends on the friction coefficient, which varies with surface condition, lubrication, and whether the threads are galvanized. A dry galvanized thread has a friction coefficient around 0.14 to 0.18. Lubricated, it drops to 0.10 to 0.14. That variation means the same torque value can produce preload anywhere from 45 kN to 75 kN. We specify calibrated torque wrenches and require verification on the first 10 bolts of every ring.
Gasket and Sealing Systems
The gasket sits in a groove or channel at the panel joint. For cement and dry powder silos, we use EPDM rubber gaskets — 5 mm thick, 40 mm wide, Shore A hardness 60 to 70. EPDM handles UV, ozone, and temperature swings from -30°C to +80°C without cracking. For coal silos where you might have hydrocarbon exposure, we switch to nitrile rubber.
The gasket compression is critical. Under-compressed and you leak. Over-compressed and the gasket extrudes out of the joint or takes a permanent set. We target 25 to 30% compression of the gasket cross-section. That means a 5 mm gasket compresses to 3.5 to 3.75 mm. The bolt spacing controls this — typically 150 to 200 mm on center along the vertical seams, 200 to 250 mm on horizontal seams. Closer bolt spacing gives more uniform compression. Wider spacing and you get a wavy gasket line with gaps at mid-span.
Torque Sequencing and Verification
You don't just torque bolts in whatever order feels natural. The sequence matters. We specify a star pattern — start at the center of the joint, work outward to the edges. For a horizontal seam with 20 bolts, that means bolt 10 first, then 11 and 9, then 12 and 8, and so on. This prevents the gasket from bunching up on one side.
After initial torque, we do a second pass 24 hours later. Gaskets relax — EPDM loses about 10 to 15% of its compression in the first day. The second torque pass brings everything back to spec. I've seen crews skip the second pass because the schedule was tight. Six months later, moisture wicking into the joint at the 3 o'clock position. The cement inside caked against the wall. They had to enter the silo with chipping hammers. That's a $40,000 cleanup that a $200 torque wrench would have prevented.
Quality Control During Fabrication
Dimensional Inspection Protocols
Every panel gets measured before it leaves the factory. We check radius with a template gauge — a steel bar machined to the nominal radius with ±2 mm tolerance bands. The panel either fits or it doesn't. We check hole positions with a coordinate measuring jig. We check flatness with a straightedge — no more than 3 mm deviation over 1,500 mm length.
Sampling rate is 100% for the first 20 panels of a production run, then 20% random inspection after that. If any panel in the random sample fails, we go back to 100% for the next 50 panels. This isn't overkill — it's the difference between catching a roll-forming die that's wearing out before it produces 500 bad panels versus after.
Coating Adhesion and Thickness Testing
Galvanizing thickness is measured with a magnetic induction gauge per ISO 2178. We take five readings per panel — four corners and center. Minimum acceptable is 55 µm for 2.5 mm steel, 70 µm for 3.0 mm and above. Adhesion is tested per ISO 2409 — a cross-hatch test with tape pull. The coating must not lift. If it does, the pre-treatment (degreasing, pickling, fluxing) was wrong, and the whole batch gets reworked.
Factory Assembly Trials
Before we ship a single panel, we assemble one full ring on the factory floor. Every panel, every bolt, every gasket. This takes about 4 hours for a 15-meter-diameter ring. It catches problems that dimensional inspection misses — like a panel that measures correctly but has a slight twist that only shows up when you try to bolt it to its neighbor. We've caught hole misalignment of 2 mm this way. On the ground, you can ream a 2 mm error. 20 meters in the air, that's a different conversation.
Common Fabrication Defects and Field Consequences
Out-of-Round Panels
A panel that's supposed to be a 7,500 mm radius arc but comes off the line at 7,510 mm won't cause a catastrophic failure. But it will cause a visible waviness in the shell. More importantly, it changes the bolt hole alignment at the joint. If both panels in a joint are out-of-round in the same direction, the error cancels. If they're out in opposite directions, you've got a 20 mm mismatch. We've seen this on a project in Indonesia — the fabricator's roll-forming die was worn on one side, producing panels with a consistent 6 mm radius error. The first three rings went up fine because the error was consistent. Then a replacement die was installed, and the fourth ring had panels with the opposite error. The closure joint was off by 12 mm. They had to re-drill holes on-site. Three days of delay, $15,000 in extra labor.
Misaligned Bolt Holes
Hole misalignment is the number one cause of assembly delays on bolted silo projects. The tolerance stack-up goes like this: panel radius error affects arc length, arc length error affects hole spacing, hole spacing error accumulates across the ring. If each panel has a 1 mm hole position error, and you've got 16 panels in a ring, the accumulated error at the closure joint is 16 mm. That's beyond the 1 mm bolt clearance. You can't assemble the joint.
The fix is to build adjustment into the design. We specify slotted holes on the closure panel — the last panel in each ring gets 20 mm × 17 mm slots instead of round holes. That gives you 3 mm of adjustment per joint, which covers most tolerance stack-ups. It costs nothing extra on the CNC punch, and it saves hours on-site.
Coating Damage During Handling
Galvanizing is tough, but it's not indestructible. A panel dropped from a forklift at a 30-degree angle will chip the coating at the impact point. Panels stacked without separators will rub against each other during transport and wear through the coating at contact points. We specify felt separators every 500 mm in the stacking rack, and nylon slings for all lifting. Wire rope slings are banned — they cut through galvanizing like a knife.
Field repair of galvanizing damage is possible but not ideal. Zinc spray or zinc-rich paint per ISO 8501-1 can restore protection at small damage points. But the repair never matches the original coating's adhesion or thickness. We limit field repairs to 5% of the panel surface area. Beyond that, the panel gets replaced.
Transport, Handling, and Site Protection
Panel Stacking and Bracing
Panels ship in bundles — typically 15 to 20 panels per bundle, separated by wooden spacers. The bundle gets strapped with nylon bands, not steel banding. Steel banding cuts into the panel edges during transport vibration. For overseas shipping, bundles go into open-top containers with desiccant packs. Humidity inside a sealed container can hit 95% during a three-week ocean crossing. Without desiccant, you'll get white rust on the galvanizing — zinc hydroxide formation. It's cosmetic, but it indicates the zinc layer is being consumed.
Site Storage Before Erection
Panels should be stored off the ground on timber cribs, covered with breathable tarpaulins — not plastic sheeting. Plastic traps condensation. We've seen panels stored on-site in Malaysia for six weeks under plastic sheeting. When the crew pulled the sheeting back, the panels were dripping wet. The moisture got trapped in the overlap joints and started flash rusting on the sheared edges. Two weeks of site labor to wire-brush and touch-up every joint edge. That's a $12,000 mistake that a $200 tarpaulin would have prevented.
Case Study: 8,000-Tonne Clinker Silo — Shandong Province
A cement plant in Shandong needed an 8,000-tonne clinker silo on a compressed 14-week schedule. The silo is 22 meters in diameter, 38 meters tall, with 16 panels per ring. We fabricated 2,848 panels over six weeks — that's 8 panels per hour on a single shift. The roll-forming line ran 10 hours per day, six days a week.
The critical detail was the bolt hole pattern. Clinker has a bulk density of 1.4 to 1.6 t/m³ and is abrasive. The silo operates at 20 kPa internal pressure during pneumatic filling. We specified M20 grade 10.9 bolts at 150 mm spacing on the vertical seams — tighter than the standard 200 mm. The CNC punch held ±0.3 mm on hole positions across the entire production run. Factory assembly of the first ring took 3.5 hours with zero rework.
On-site, the erection crew assembled one ring per day — 16 panels, 320 bolts. The closure joint on every ring fell within the 3 mm adjustment range of the slotted holes. Total erection time: 14 days for the shell. The plant manager told me it was the fastest silo erection he'd seen in 20 years. That speed came from fabrication precision, not from the crew working miracles on-site.
FAQ
Q: Can bolted silo panels be re-used if a silo is relocated?
A: Yes, if the panels haven't been damaged or corroded. We've dismantled and re-erected silos at new sites. The key is documenting every panel's position during disassembly and reassembling in the same sequence. Bolted connections are designed for disassembly — that's the whole point. Galvanized panels in good condition will perform identically on the second installation. We've done this on three projects — the oldest re-used panels were 12 years old at the time of relocation, and they're still in service.
Q: What's the maximum panel thickness for roll-forming?
A: Most roll-forming lines handle up to 6.0 mm thickness. Beyond that, the forming forces become excessive and the springback becomes unpredictable. For silos requiring thicker shell sections — say 8 mm or 10 mm for high-pressure applications — we switch to welded construction for the lower rings and use bolted panels only for the upper sections. The transition ring is a welded component that interfaces with the bolted shell above. This hybrid approach is common on large-diameter slag and coal silos.
Q: How do you verify bolt preload without a load-indicating washer?
A: The most practical method is the turn-of-nut technique per EN 1090-2. Snug the bolt to about 10% of final torque, then rotate the nut a specified angle — typically 120 degrees for M16 grade 8.8 bolts in the standard length range. This method is less sensitive to friction variation than torque-only control. We use it on seismic-zone projects where preload reliability is critical. For standard projects, calibrated torque wrenches with a second-pass verification are sufficient.
Need Bolted Silo Panels That Actually Fit?
At Manxing, we fabricate bolted steel silo panels in-house — roll-forming, CNC punching, hot-dip galvanizing, and factory assembly trials under one roof. Every panel ships with a dimensional inspection report. We've supplied panels for over 200 silo projects across 30 countries, from 500-tonne fly ash silos to 15,000-tonne cement terminals. If you're specifying a bolted silo and want to avoid the field problems that come from fabrication shortcuts, talk to our engineering team. We'll walk you through the panel specifications, tolerances, and quality checks that keep your erection crew moving instead of reaming holes at height.